How do I replace a garbage disposal?
If your old disposal plugs into an outlet under the sink, a like-for-like swap is a manageable afternoon job: unplug it, disconnect the drain and dishwasher hose, twist the old unit off its mount, fit the new mount if needed, hang the new unit, reconnect the drain, test for leaks, then plug it in. A hardwired unit is a job for an electrician.
Free to ask. Local shops send quotes, and you pay only when you book one.
By Kasra Taheri, Founder, LoclisPublished
Researched and drafted with AI, then checked claim by claim against the sources listed below before it was published. Prices and rules change; the dates beside each source say when it was last checked.
Step by step
Read when to stop and call a pro, further down this page, before you start.
Step 1: Confirm it plugs in
Look under the sink: if the disposal's cord plugs into an outlet, carry on; if wires run into the unit from the wall or a junction box, stop and call an electrician.
Step 2: Buy a matching replacement
Choose a unit with a factory-installed cord, or have an electrician or plumber fit a cord kit, and check whether it fits your existing mount, which saves several steps.
Step 3: Cut the power
Unplug the disposal and switch off its circuit breaker before you touch anything else.[1]
Step 4: Disconnect the drain
Put a bucket under the trap, loosen the nut joining the trap to the disposal's discharge tube, and disconnect the dishwasher hose if one is attached.[1]
Step 5: Drop the old unit
Support the disposal from below, put the wrenchette in a mounting lug and turn until the unit comes free, keeping your head out from under it.[1]
Step 6: Keep or remove the mount
If the new disposal uses the same mount, leave it in the sink; otherwise loosen its three screws, pry off the snap ring and push the old flange up out of the sink.[1]
Step 7: Seat the new sink flange
Scrape off the old putty, press the new flange into a 1/2-inch rope of plumber's putty, and hold it down with a weight on a towel.[2]
Step 8: Fit the new mount
From below, slide on the fiber gasket, backup flange and mounting ring, press the snap ring into place, and tighten the three mounting screws evenly.[1]
Step 9: Open the dishwasher inlet
Only if a dishwasher drains into the disposal, lay the new unit on its side, tap out the drain plug and fish the loose plug out of the chamber.[1]
Step 10: Attach the discharge tube
Fit the gasket and discharge tube to the outlet with the flange and two bolts, and use no putty or thread sealant on any joint but the sink flange.[1]
Step 11: Hang and lock the unit
Lift the unit, line up its three mounting tabs with the ramps on the mounting ring, and turn until all three latch over the ridges.[1]
Step 12: Reconnect the drain
Turn the unit so the discharge tube lines up with the trap, trim the tube if it is too long, and reconnect the trap and the dishwasher hose.[2]
Step 13: Test for leaks
Before plugging it in, check for leaks at the sink flange, dishwasher, tail-pipe and mounting assembly connections; dry paper towels wrapped around each joint show drips quickly.[2]
Step 14: Power up and run it
Plug the unit in, switch the breaker back on, run cold water and turn the disposal on to check that it grinds and drains.[1]
Replacing a garbage disposal is a reasonable job for a handy homeowner when the old one plugs into an outlet under the sink and the new one goes into the same spot. You need a bucket, a flashlight, slip-joint pliers, a screwdriver, a putty knife, plumber's putty and a couple of towels. Most of the work is undoing and redoing the drain connections, and most of the risk is a slow leak you do not notice for a week.
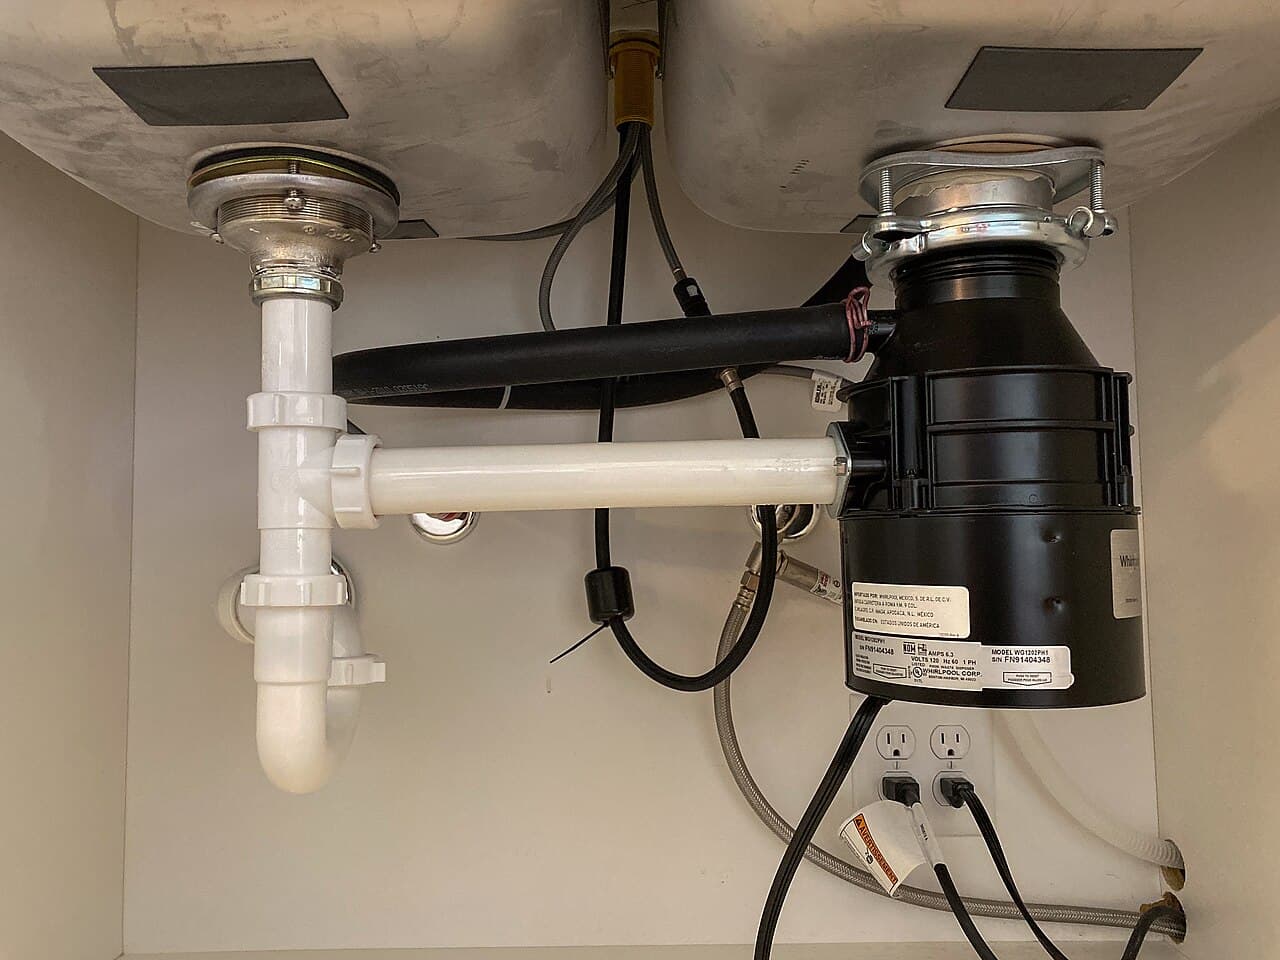
First, check how it is powered
Open the cabinet and follow the cord. If the disposal has a cord with a plug in an outlet, as in the photo, it is a plug-in unit and this guide fits. If a cable runs straight from the wall or a metal box into the bottom of the unit, it is hardwired. That is house wiring, and InSinkErator's manual notes that a hardwired disposer needs a switch with a marked Off position installed within sight of the sink opening.[1] Leave that connection to a licensed electrician.
Many new disposals are sold without a cord. The simplest choice is a unit with a factory-installed cord. Fitting a separate power cord kit means opening the splice compartment on the bottom of the unit and joining wires,[3] which is wiring work, so have an electrician or plumber fit it. If a kit is used, the kit needs a three-wire grounded receptacle within 3 feet of the disposal, and if the outlet is not properly located, the maker says to have one installed by a qualified electrician.[3] If the plug does not fit the outlet, do not modify it or force it; InSinkErator says to have a proper outlet installed by a qualified electrician.[1]
Choosing the replacement
Buying a unit that fits your existing mount saves the fiddliest part of the job. InSinkErator says its Badger models can be swapped for any other Badger or Evolution model thanks to similar plumbing rough-in dimensions.[4] Check the mount type on the old unit's label before you shop, and measure the space under the sink if you are moving to a larger motor.
Before you buy anything, check whether the old one is still under warranty. InSinkErator's in-home warranty covers replacement parts and labor, but it is void if you attempt to repair the unit yourself.[1] A call to the maker may get the unit replaced for nothing.
Taking the old one out
Unplug the disposal and switch off its breaker, then disconnect the trap from the discharge tube and the dishwasher hose if there is one. Have a bucket ready; the trap holds water. When you turn the mounting ring to release the unit, keep your head and body out from under the disposal, because it can fall during removal or installation.[1] Support it from below with one hand.
If the new unit uses a different mount, take the old mount out of the sink, push the old flange up through the hole and scrape off every bit of old putty. A clean, dry sink opening is what keeps the new flange from leaking.
Putting the new one in
Scrape the sink opening clean and seat the new flange in a 1/2 inch rope of plumber's putty around the drain opening,[2] fit the gasket, backup flange and mounting ring from below, and tighten the three screws a few turns at a time so the assembly pulls up evenly.
The dishwasher plug. If your dishwasher drains into the disposal, the new unit's dishwasher inlet has to be opened. Once the drain plug is knocked out it cannot be put back, and if the dishwasher is connected without removing it, the dishwasher may overflow.[1] If there is no dishwasher, leave it alone.
The cord. A unit with a factory-installed cord needs nothing here. If the unit came without one, have the pro fit the cord kit before you hang it, because InSinkErator says "The power cord must be installed before the disposer is mounted in the sink."[3]
The seals. Plumber's putty goes on the sink flange only; InSinkErator warns against putty, thread sealant or pipe dope on any other disposal connection.[1]
Hanging it. Lift the unit into place and turn it until it locks. To avoid leaks and a falling hazard, all three mounting tabs must latch over the ridges.[1] Then turn the unit so the discharge tube lines up with the trap, trim the tube if it is too long or buy an extension if it is too short.[2]
The slope. InSinkErator says the drain line should slope at least 1/4 inch per foot from the disposal to the drain connection, with that connection lower than the disposal's outlet.[1] Standing water left in the unit can lead to early corrosion or leaks.[1] If the drain in the wall sits higher than the disposal's outlet, that is a piping change, not a swap.
Test before you trust it
Do the leak test before you plug anything in. InSinkErator says to test for leaks at the sink flange, dishwasher, tail-pipe and mounting assembly connections.[2] An easy way is to put the stopper in, fill the sink, wrap dry paper towels around each of those joints, then pull the stopper and check each towel. A wet towel points to the joint above it. Tighten or reseat that joint and test again. Then plug the unit in, switch the breaker on, run cold water and try it. Check under the sink again the next day.
For the old unit, garbage disposals are mostly metal, so InSinkErator suggests taking the old one for scrap metal recycling rather than to the landfill.[5]
Permits in Virginia
Virginia's building code requires a permit for installations or alterations involving the sanitary drainage system or electric wiring, and it exempts the replacement of plumbing fixtures without alteration of the water supply, drainage or vent systems.[6] A plug-in swap on the same drain and outlet leaves the house's pipes and wiring as they were. A first-time install, a new outlet or a re-routed drain does not, so ask your local building department before you start one of those.
Stop and call a pro if
- The disposal is hardwired, or there is no grounded outlet within reach of the cord. That is electrical work for a licensed electrician.
- There has never been a disposal here. A first install usually means new drain parts and a new outlet. See whether to hire a plumber to install a garbage disposal.
- The drain in the wall is higher than the disposal's outlet, or the trap and drain arm are cracked or corroded and come apart in your hands.
- The sink flange or mount keeps leaking after you have reseated it in fresh putty. A cracked or thin sink may need more than a new disposal. The guide to fixing a leaking pipe under the sink covers the joints below it.
- A breaker trips when the new unit runs, you smell burning or hot plastic, or the outlet looks scorched, feels warm or sparks. Switch off the breaker, leave the disposal unplugged and have an electrician check the outlet and circuit before you use it again.
- Water appears inside the cabinet with the sink empty. That points to the supply lines, not the disposal.
Getting help on Loclis
If you would rather not lie under the sink, licensed plumbers on Loclis install disposals. Browse garbage disposal services, find plumbers in Blacksburg, read what disposal installation costs in Virginia, or see every plumbing answer.
When you are ready, describe the disposal job once and licensed local plumbers quote it.
Common questions
- Can I replace a hardwired garbage disposal myself?
- Not with this guide. A hardwired disposal is connected to the house wiring and switch, and that is a job for a licensed electrician, or for a plumber working with one. If the disposal plugs into an outlet under the sink, a like-for-like swap is a reasonable job for a handy homeowner.
- Do I have to replace the mounting ring and sink flange?
- Not always. If the new unit uses the same mount as the old one, you can leave the existing mount in the sink and go straight to hanging the new unit. If the mount is different, corroded or has leaked, replace it with the one in the box.
- What is the dishwasher knockout plug?
- It is a plastic plug sealing the dishwasher inlet on a new disposal. Knock it out only if a dishwasher drains into the disposal, because it cannot be put back. If a dishwasher is connected and the plug is left in, the dishwasher may overflow.
- Do I need a permit to replace a garbage disposal in Virginia?
- Virginia's building code requires a permit for work that alters the drainage piping or the electric wiring, and exempts replacing plumbing fixtures without altering the supply, drain or vent piping. Ask your local building department if you are not sure where your job falls, especially for a first-time install.
- What do I do with the old disposal?
- Garbage disposals are mostly metal, so InSinkErator suggests taking the old one to a scrap metal recycler rather than putting it in the landfill. Check your county or city solid waste office for a metal drop-off near you.
Sources
- [1] Badger Series Installation, Care and Use Manual, InSinkErator. Checked October 26, 2026.
- [2] Installing a Replacement Garbage Disposal, InSinkErator. Checked October 26, 2026.
- [3] Power Supply Cord Assembly instruction sheet, InSinkErator. Checked October 26, 2026.
- [4] Garbage Disposal Replacement Guide, InSinkErator. Checked October 26, 2026.
- [5] FAQs: Garbage Disposal Support and Advice, InSinkErator. Checked October 26, 2026.
- [6] 13VAC5-63-80. Section 108 Application for permit (Virginia Uniform Statewide Building Code), Virginia Administrative Code, Virginia General Assembly. Checked October 26, 2026.
Want a pro to handle it?
Describe the job once. Licensed local businesses send quotes, and you pay only when you book one.
Get a quote for Plumbing Repair