How do I replace rotted exterior trim?
Probe the trim to find how far the rot goes, then remove only what is soft. A small spot can be filled with exterior epoxy or a spliced-in patch; a board that is soft through gets replaced. Prime every face and cut end before it goes up, nail it with stainless or hot-dipped galvanized nails, caulk, paint, and fix the leak that caused it.
Free to ask. Local shops send quotes, and you pay only when you book one.
By Kasra Taheri, Founder, LoclisPublished
Researched and drafted with AI, then checked claim by claim against the sources listed below before it was published. Prices and rules change; the dates beside each source say when it was last checked.
Step by step
Read when to stop and call a pro, further down this page, before you start.
Step 1: Check the age of the house
If the house was built before 1978 and you cannot confirm otherwise, assume the paint contains lead and use lead-safe practices.[4]
Step 2: Find where the water comes from
Look above and around the rot for failed caulk, an overflowing gutter, or a trim end sitting on a sill or step.
Step 3: Probe the wood
Push a small screwdriver or awl into several spots, especially bottom edges and end grain, and mark where the wood turns soft.[1]
Step 4: Decide repair or replace
Fill or patch a small soft area in otherwise sound trim; replace the board if the rot runs through it or along much of its length.
Step 5: Score and mist the paint
Mist painted surfaces to keep dust down, then score the caulk and paint line where the trim meets siding so the siding paint does not tear.[4]
Step 6: Take off the rotted piece
Ease the board off with a flat bar over a scrap block to protect the siding, and pull or cut off the old nails.
Step 7: Look behind it
Check the sheathing and framing behind the trim; if they are soft or wet, stop and call a pro.
Step 8: Cut the new board
Use the old piece as a pattern, match its thickness and profile, and keep cuts square so joints close tightly.
Step 9: Prime every face before it goes up
Back-prime the board with one coat and give exposed end grain two coats of primer.[3]
Step 10: Keep end grain off flat surfaces
Hold the bottom end of vertical trim slightly above a sill or step instead of letting it sit in water, and seal that end.[1]
Step 11: Nail it into framing
Fasten with stainless steel or hot-dipped galvanized nails and set the heads just below the surface.[2]
Step 12: Fill and caulk
Fill nail holes, spot prime the filler, and caulk vertical joints, leaving the horizontal laps of lap siding open.[1]
Step 13: Paint promptly
Topcoat with two coats of a quality exterior paint soon after priming, and avoid leaving exposed wood unpainted for any length of time.[3]
Step 14: Clean up
Collect paint chips and dust on plastic sheeting and finish with a HEPA vacuum and wet wiping, especially on an older house.[4]
Replacing rotted exterior trim is a carpentry job most handy homeowners can do on a single-storey wall: find out how far the rot goes, take out only what is soft, put in a new piece primed on every face, and stop the water that caused it. That last part matters most. Decayed wood does not hold paint,[1] and a new board installed the same way as the old one will rot the same way. In the National Park Service's words: "If the cause of material failure is not addressed, the replacement will also fail."[2]
Before you start
Lead paint. If the house was built before 1978, the trim may carry lead paint, and the EPA advises assuming the paint contains lead if you cannot determine the age of the house.[4] Lead-safe work for a homeowner means plastic sheeting under the work, misting surfaces before you sand, scrape or cut, a HEPA vacuum for cleanup, and a disposable N-100 respirator.[4] Avoid dry sanding old paint; where sanding is unavoidable, mist first and use wet-dry sandpaper.[4]
Permits. Virginia's rules are simple here: the Uniform Statewide Building Code lists installation or replacement of trim, and application of paint, among the ordinary repairs that need no permit application.[5] Two exceptions are worth knowing. A building official may require a permit for exempt work in a special flood hazard area,[5] and historic districts have their own approvals. Loudoun County, for example, requires a Certificate of Appropriateness for changing materials on an existing structure in its historic districts, but not for replacement in kind or repainting.[6] If you live in a historic district and want to swap wood for PVC, ask your locality first.
Ladders. Keep this a ground-floor job. For the trim you do reach from a ladder, set the base out one-fourth of the height to where the ladder rests, never stand on the top two rungs, keep three points of contact, and skip ladder work in wind over 20 miles per hour.[7] Metal ladders must not be used near electrical wires,[7] which matters at the corner where the service drop meets the house.
Find out how far the rot goes
Rot rarely shows its full size. Water gets in at a bottom end, a miter or an open joint, and the surface can look sound over decayed wood; the Forest Products Laboratory advises probing several areas with a small-tipped screwdriver.[1] An awl works too: sound wood resists the tip, rotted wood lets it sink in or comes away in soft, stringy fibers. Check the bottom edges and ends of every piece near the damage, because liquid water enters wood 10 to 100 times faster through end grain than through the other faces.[1]
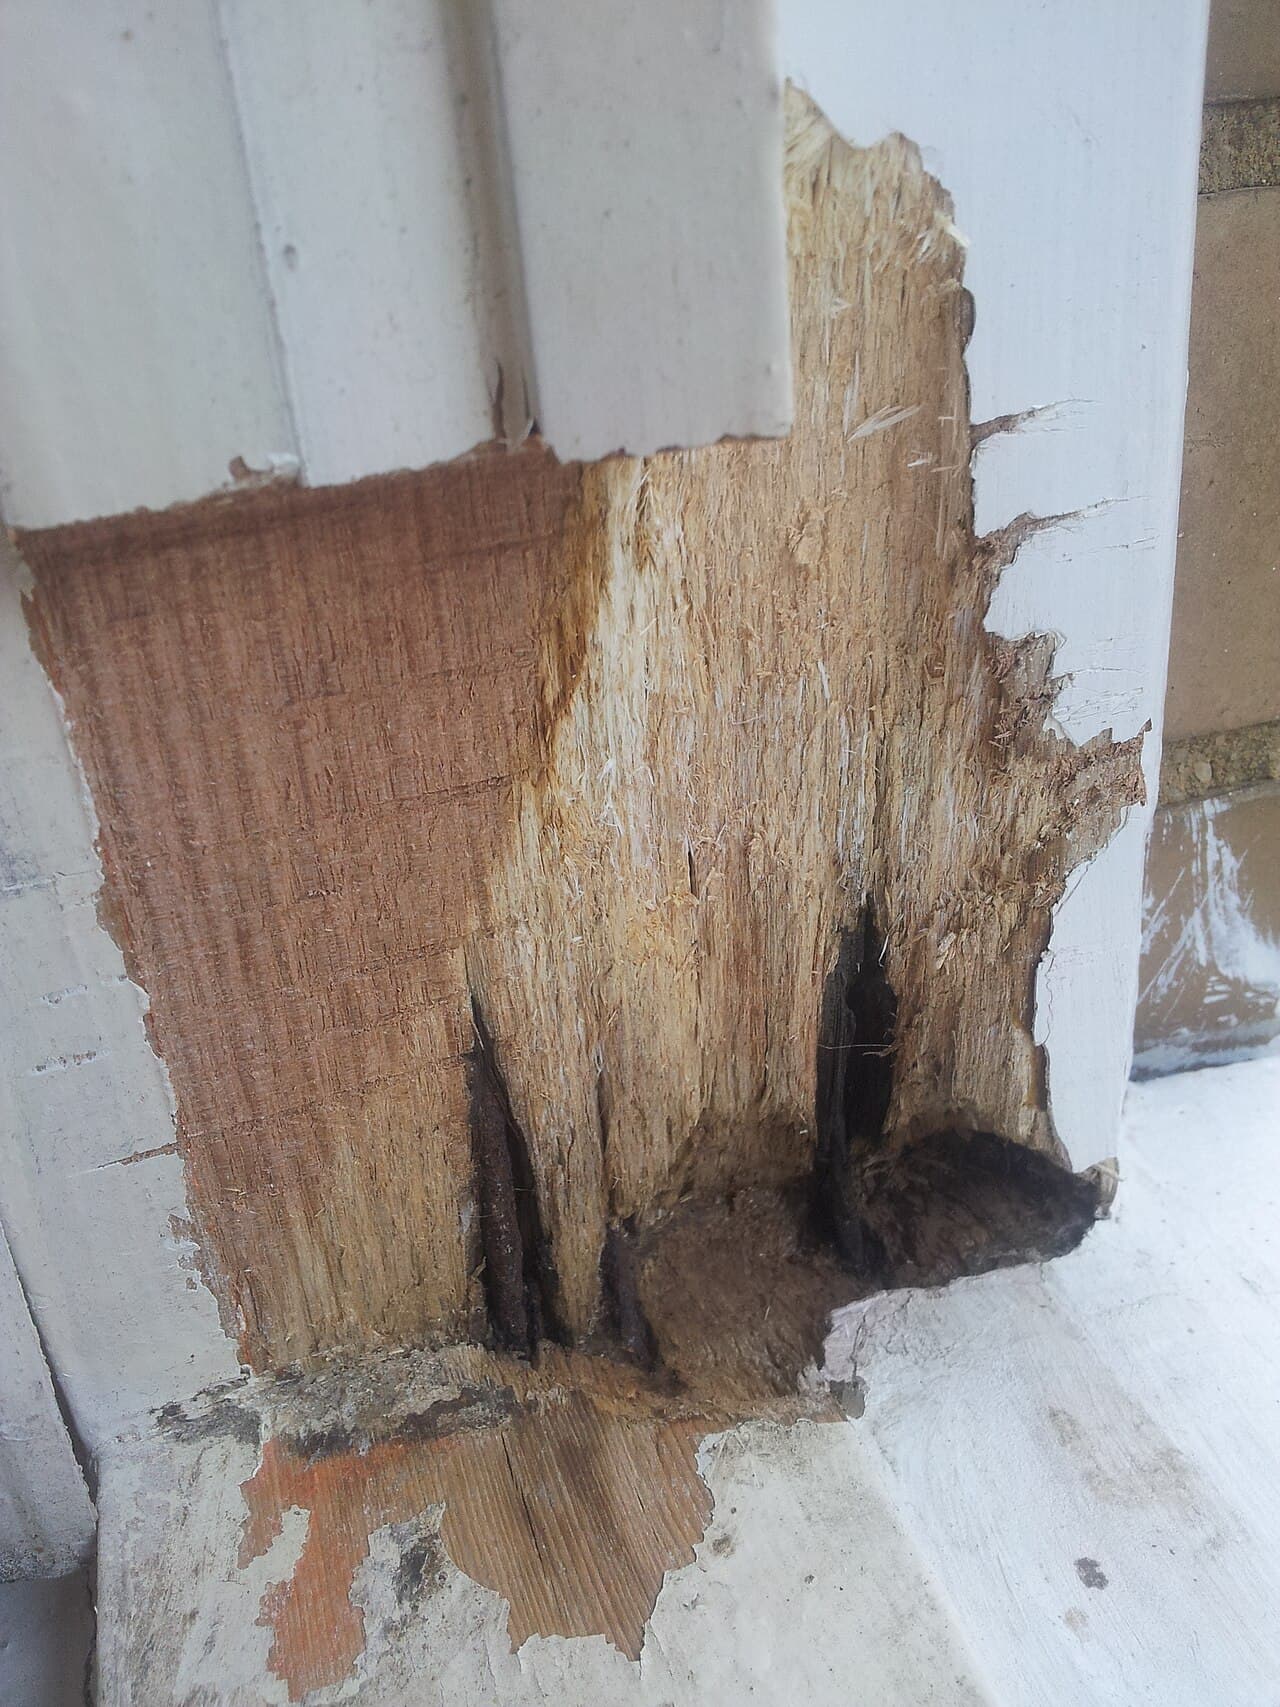
Repair or replace
Small, shallow soft spots in otherwise sound trim can be repaired. Cellulose wood fillers must be rated for exterior use and need a protective finish.[2] Two-part epoxies are tougher: two-part epoxies bond tenaciously with wood and can be sawn, nailed or sanded, but they are only for areas that will be painted, because they do not take stain and deteriorate in sunlight.[2] Either way, dig out all the soft wood first; filler over rot only hides it.
A larger damaged section of a long or decorative piece can take a spliced patch, the carpenter's "dutchman": chisel out the decayed wood, glue in a piece of the same kind of seasoned wood with a waterproof adhesive such as an epoxy formulated for wood, then plane or sand it flush.[2]
A board that is soft through, or soft along much of its length, should be replaced. Plain casing, corner boards and rake boards are usually cheap enough that replacing the whole piece is faster than patching it.
Choosing the replacement
Match the old board's thickness and profile so the paint lines and caulk joints work. Beyond that, the material decides how long the repair lasts.
- Wood. White pine, western redcedar and redwood hold paint well; southern yellow pine and Douglas-fir, with their wide dense latewood bands, are harder to keep painted.[1] Finger-jointed boards are common for fascia and trim, and paint on them often fails in a patchwork pattern or at a joint where the pieces move differently.[1]
- Cellular PVC. Versatex says its cellular PVC trim will not swell or shrink like wood experiencing a moisture cycle,[8] which makes it a sensible choice at sills, near the ground and anywhere splash-back keeps wood wet. It moves with temperature instead, so follow the maker's instructions: Versatex calls for fasteners that penetrate a full 1 1/4 inches into the framing, placed no more than 2 inches from the end of a board, and paint colors with a light reflective value of 55 or greater.[8]
Putting the new piece up
The steps above cover the whole job. Three details make the difference between a repair that lasts and one you redo in a few years.
Prime it before it goes up. "Priming before installation (even in your garage) is the best way to extend paint life."[1] The back and the cut ends are the faces you can never reach again once the board is nailed on.
Keep end grain out of standing water. "Leave space below the bottom of any board exposed to weather so that the bottom edge does not stay wet after a rain."[1] Vertical casing that sits tight on a sill or a porch floor wicks water up its end grain; a small gap, sealed with primer, drains instead.
Caulk with restraint. Caulk the vertical joints between trim and siding, but do not seal the horizontal overlap of lap siding,[1] which is how water that gets behind the siding drains out.
Then paint. Bare primed wood is not a finished surface, and research cited by the Forest Products Laboratory found that surface degradation from as little as one week of sun exposure before painting significantly shortened the life of the paint.[1] Two topcoats over primer is the usual system.
If the old trim keeps cracking or peeling elsewhere, read why paint on window trim cracks, and for the habits that stop the next repair, see how to keep exterior trim from rotting.
Stop and call a pro if
- The sheathing, a sill plate, a header or any framing behind the trim is soft or wet. That is structural repair, not trim.
- The rot is in a porch column or post. The National Park Service notes that column repairs are usually work for an experienced carpenter because they may involve supporting the roof above.[2]
- You find mud tubes or tunnels in the wood. "A termite tunnel is a sure sign of infestation."[1] Call a pest control company before any carpentry.
- The trim is above the first storey, or it is fascia or rake board along a roofline. Two-storey ladder work and anything at the roof edge are jobs for a crew with the right access equipment.
- The window or door frame itself is rotted, not just the casing around it.
- The house was built before 1978, the job will disturb a lot of paint, and you cannot keep the dust contained.
Getting it fixed on Loclis
On Loclis you describe the trim repair once, with photos of the damage, and local businesses quote it; a business that needs to see it first can offer an estimate visit. See what trim replacement costs in Virginia, browse shutters and exterior trim pros, find exterior pros around Blacksburg, or read more exterior answers.
Common questions
- Can I just fill rotted trim with wood filler?
- Only when the soft area is small and the wood around it is sound. Dig out every bit of soft wood first, use a filler made for exterior use or a two-part epoxy, then prime and paint over it. If the board is soft through, or soft along much of its length, replacing it is the lasting fix.
- Should I replace rotted wood trim with PVC?
- Versatex says its cellular PVC trim does not swell or shrink like wood in a moisture cycle, so it is a good choice for trim near the ground, at sills and anywhere water collects. It moves with temperature instead, needs the right fasteners, and is limited to lighter paint colors. In a historic district, switching materials may need approval first.
- Do I need a permit to replace exterior trim in Virginia?
- Usually not. The Uniform Statewide Building Code exempts installing or replacing trim, and painting, from permit applications. A building official can still require one in a special flood hazard area, and a locality's historic district rules can require separate approval before you change materials.
- Why did my trim rot when the paint looked fine?
- Decay can sit under a surface that still looks sound, and it usually starts where water gets in, such as an unsealed end or an open joint. Probing several spots with a small screwdriver finds it before the paint shows it.
- What kind of nails should I use on exterior trim?
- Stainless steel or hot-dipped galvanized nails long enough to reach the framing. Plain steel nails rust and stain the paint around them. Set the heads slightly, fill the holes, and spot prime the filler before painting.
Sources
- [1] Chapter 16: Finishing Wood, Wood Handbook (FPL-GTR-282), USDA Forest Service, Forest Products Laboratory. Checked October 26, 2026.
- [2] Preservation Brief 45: Preserving Historic Wood Porches, National Park Service. Checked October 26, 2026.
- [3] Preservation Brief 47: Maintaining the Exteriors of Small and Medium Size Historic Buildings, National Park Service. Checked October 26, 2026.
- [4] Lead-Safe Renovations for DIYers, U.S. Environmental Protection Agency. Checked October 26, 2026.
- [5] 13VAC5-63-80. Section 108 Application for permit (Virginia Uniform Statewide Building Code), Virginia Administrative Code (Virginia General Assembly). Checked October 26, 2026.
- [6] Applying for a Certificate of Appropriateness, Loudoun County, Virginia. Checked October 26, 2026.
- [7] Portable Ladder Safety Program, Virginia Commonwealth University, Safety and Risk Management. Checked October 26, 2026.
- [8] VERSATEX Installation Guidelines (Rev 12/23), Versatex Building Products. Checked October 26, 2026.
Want a pro to handle it?
Describe the job once. Licensed local businesses send quotes, and you pay only when you book one.
Get a quote for Roofing