Why is the paint on my window trim cracking?
Usually because the paint can no longer move with the wood. Many old layers turn hard and brittle and craze, water gets in at sills, joints and end grain and swells the wood, or the wood itself checks along the grain, at knots or at finger joints. Find the water and any rot first, then remove paint back to a sound layer and repaint.
Free to ask. Local shops send quotes, and you pay only when you book one.
By Kasra Taheri, Founder, LoclisPublished
Researched and drafted with AI, then checked claim by claim against the sources listed below before it was published. Prices and rules change; the dates beside each source say when it was last checked.
Step by step
Read when to stop and call a pro, further down this page, before you start.
Step 1: Check the year built
If the house was built before 1978 or you are not sure, treat the old paint as lead paint and work lead-safe.[4]
Step 2: Read the crack pattern
Note whether the cracks are a fine surface web, run along the grain, run across it, or sit at joints, knots and sills.
Step 3: Probe the wood
Push a small screwdriver into the sill, the bottom of the casing and any spot where paint has lifted, and replace or repair soft wood before painting.[2]
Step 4: Find the water
Look for failed caulk at joints, an overflowing gutter above, shrubs against the wall, and sills that hold water.
Step 5: Test the old paint
Press an adhesive bandage onto a test patch of dried primer, snap it off, and see whether paint comes away with it.[2]
Step 6: Remove the failing paint
Mist the surface, then scrape cracked and flaking paint back to a layer that is still bonded, collecting the chips on plastic sheeting.[4]
Step 7: Smooth the edges
Feather the edges of the remaining paint with wet-dry sandpaper or a sanding sponge, kept damp to hold down dust.[4]
Step 8: Prime bare wood quickly
Prime any bare wood within 48 hours so it does not weather before it is sealed.[1]
Step 9: Caulk open joints
Clean out failed caulk, then caulk primed vertical joints between casing, sill and siding, leaving drainage gaps and siding laps open.
Step 10: Topcoat
Apply two coats of a quality exterior paint, avoiding late afternoons when heavy dew is expected.[2]
Step 11: Clean up
Finish with a HEPA vacuum and wet wiping, and bag the chips and plastic for disposal.[4]
Paint on window trim cracks when it can no longer move with the wood underneath it. That happens for a handful of reasons: old layers have built up until they are hard and brittle, water is getting into the wood at the sill, the joints or the end grain, the wood itself is checking, or the coating went on too thin or over weathered wood. The crack pattern usually tells you which, and the fix depends on it.
Read the crack pattern
A fine web of hairline cracks in the top layer. This is crazing. Crazing, fine jagged breaks in the top layer, appears when paint several layers thick becomes hard and brittle with age and can no longer expand and contract with the wood.[1] It is common on older houses, because once paint builds up to about 1/16 inch, roughly 16 to 30 layers, one more coat can be enough to set off cracking and peeling.[1]
Deep cracks in a grid, like reptile skin. This is crazing that was left too long. Left alone, crazing lets water in, the wood swells, and the cracks deepen into alligatoring, a pattern of horizontal and vertical breaks that looks like reptile skin.[1]
Long cracks running with the grain. Cracking parallel to the grain shows up on smooth flat-grain lumber, often along the dense latewood bands, and is helped along by raised grain and by coatings that are too thin or not flexible enough.[2]
Cracks running across the grain. Modern latex paints seldom crack across the grain.[2] When they do, the wood under it is probably moving, such as checking juvenile wood cut from near the center of the log, which calls for replacing the board.[2] Otherwise, cross-grain cracking usually turns up where there are thick layers of old oil-alkyd paint, and old alkyd paint potentially contains lead.[2]
Cracks at miters, butt joints and finger joints. Separate pieces of wood move separately. Finger-jointed boards are common for exterior trim, and paint often fails at a joint where the pieces on either side move differently with moisture.[2]
Cracks over knots. Knots are extremely prone to cracking,[2] and even the best paints cannot bridge over large cracks or checks that develop in the wood.[2]
Cracks with peeling or blisters, worst at the sill. That is water. Flaking often follows cracking; small cracks in paint allow water to enter.[2]
Why window trim fails first
Windows combine everything paint dislikes. Sills face the sky, and exposed horizontal surfaces of window frames tend to deteriorate much faster than vertical ones.[3] Casings have many joints and end grain where they meet the sill. Sun matters too: dark colors are more susceptible to water blisters than light ones because they get hotter in the sun.[2] And water that gets behind the trim shows up as blisters and peeling, since water blisters are common near unsealed end grain of trim and where rain gets in around improperly flashed windows.[2]
Check for rot before anything else
Decayed wood does not hold paint,[2] so probe the sill and the bottom of each casing with a small screwdriver. The National Park Service notes that rot is a strong possibility on a sill that has sat under standing water, and the wood should be repaired or replaced before repainting.[1] If it is soft, see how to replace rotted exterior trim.
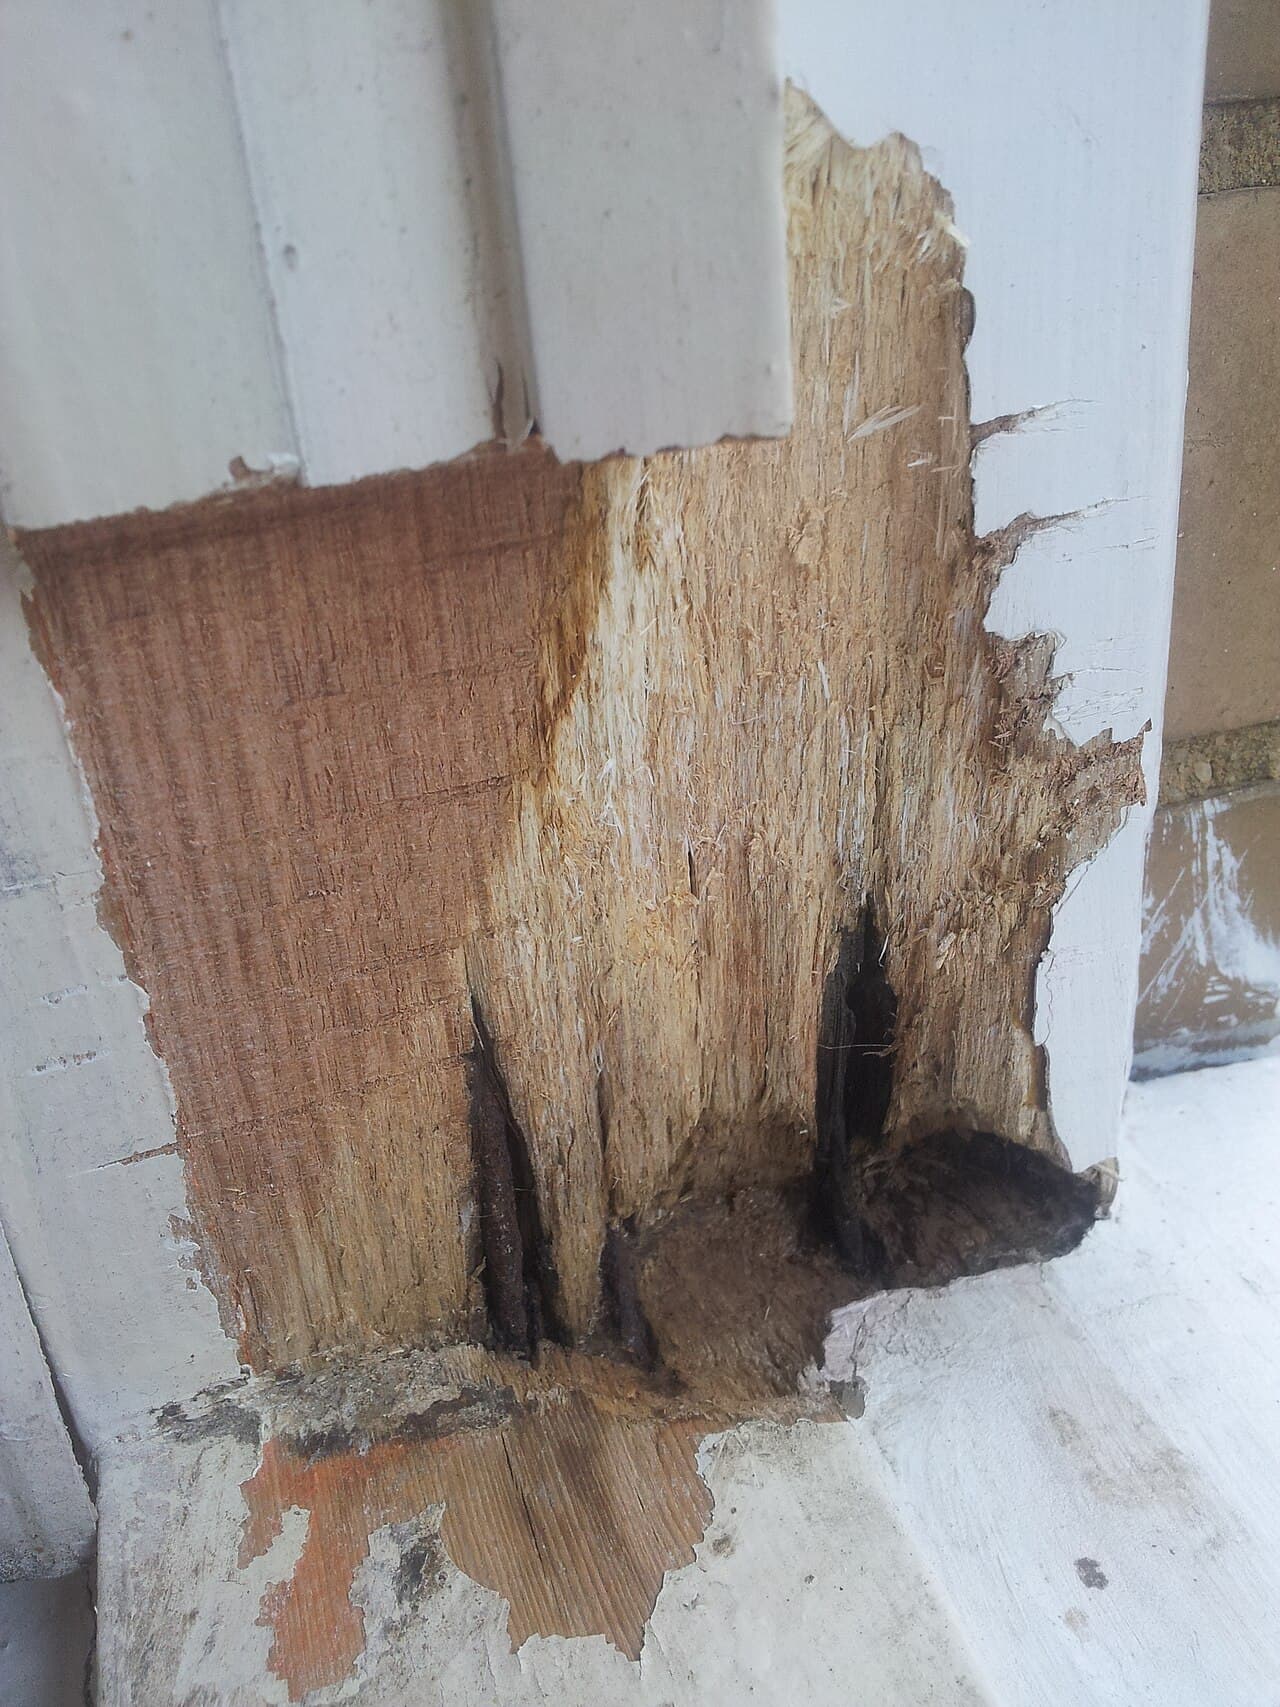
Stop the water
Repainting before the water is fixed only buys a season. The usual sources are faulty flashing, leaking gutters, cracks and holes in siding and trim, deteriorated caulking in joints and seams, and shrubbery growing too close to painted wood.[1] Clean out the gutters, cut plants back from the wall, and recaulk open vertical joints. For more on gutters, see why gutters overflow.
Fix the paint to match the failure
- Crazing or cracks in the top layers. If cracking is only in the top layers, scrape and sand to the next sound layer and repaint.[1] For cracks along the grain, "If the cracking is not too severe, sand and apply one or two topcoats to give additional film-build."[2]
- Alligatoring or cracks down to bare wood. If it has reached bare wood and the paint is flaking, the paint needs to be removed entirely, and bare wood should be primed within 48 hours.[1]
- Not sure how well the old paint is bonded? Prime a small patch, let it dry overnight, press on an adhesive bandage and snap it off. If both the new paint and the old paint stick to the tape, the old paint is not well bonded to the wood and must come off.[2]
When you prime, choose the primer with care: latex primers stay more flexible and are less likely to crack as they age than older oil-based primers.[2] And do not repaint on a schedule for its own sake. Too many coats of latex paint can eventually lead to adhesion failure of the primer.[2] "If paint is sound, but discolored with mildew, wash it. It does not need repainting."[2]
On a house built before 1978, assume the old paint contains lead. Mist before scraping, use wet-dry sandpaper rather than dry sanding, and if paint must be softened, use a low-temperature heat gun under 1,100 degrees Fahrenheit or a chemical stripper, used by the label.[4] If you hire the work out, contractors paid to disturb paint in a pre-1978 home must be EPA lead-safe certified.[5]
Stop and call a pro if
- The sill or casing is soft, or the window frame itself has rotted.
- The cracking is on second-storey windows you would have to reach from a tall ladder.
- Alligatoring covers most of the house and the paint has to be stripped to bare wood, especially on a pre-1978 house.
- Water keeps getting in after you recaulk, which points to flashing around the window or a roof or gutter problem above it.
In Virginia, painting contracting is a licensed specialty that covers surface preparation, caulking, sanding, and cleaning preparatory to painting.[6] To keep it from coming back, see how to keep exterior trim from rotting, and if you are unsure who to hire, read carpenter or painter for exterior trim.
Getting it fixed on Loclis
On Loclis you describe the trim job once, with close-up photos of the cracking, and local businesses quote it. Browse exterior painting, find painters around Blacksburg, or read more exterior answers.
Common questions
- Can I paint over cracked paint on window trim?
- Only over fine surface crazing, after sanding. Paint over deeper cracks or flaking paint fails with the old layer underneath it. Scrape and sand back to paint that is still firmly bonded, prime any bare wood, and then repaint.
- Why does my window sill crack and peel before the rest of the trim?
- The sill is a horizontal surface that catches rain, holds water at its joints with the casing, and takes the most sun. Exposed horizontal parts of window frames wear out much faster than vertical ones, so sills usually need attention first.
- Is cracked paint on old windows dangerous?
- It can be. Homes built before 1978 may have lead paint, and cracking, chipping paint on windows creates dust and chips that are hazardous, especially to children. Treat old paint as lead paint unless it has been tested, and avoid dry sanding or high-heat removal.
- Will a better paint stop the cracking?
- Not on its own. A flexible primer and quality topcoats help, but paint cannot bridge cracks in the wood, stop water getting in at open joints, or hold onto decayed wood. Fix the wood and the water first.
- How long should paint on window trim last?
- It depends on exposure. The National Park Service notes that windows and shutters may need repainting every five to seven years, and sunny, rain-exposed sides wear faster than shaded ones.
Sources
- [1] Preservation Brief 10: Exterior Paint Problems on Historic Woodwork, National Park Service. Checked October 26, 2026.
- [2] Chapter 16: Finishing Wood, Wood Handbook (FPL-GTR-282), USDA Forest Service, Forest Products Laboratory. Checked October 26, 2026.
- [3] Preservation Brief 47: Maintaining the Exteriors of Small and Medium Size Historic Buildings, National Park Service. Checked October 26, 2026.
- [4] Lead-Safe Renovations for DIYers, U.S. Environmental Protection Agency. Checked October 26, 2026.
- [5] Lead Renovation, Repair and Painting Program: Contractors, U.S. Environmental Protection Agency. Checked October 26, 2026.
- [6] 18VAC50-22-30. Definitions of specialty services (Board for Contractors Regulations), Virginia Administrative Code (Virginia General Assembly). Checked October 26, 2026.
Want a pro to handle it?
Describe the job once. Licensed local businesses send quotes, and you pay only when you book one.
Get a quote for Roofing