How do I fix a leaking gutter seam?
Wait for a dry day, clear the gutter, scrape the old sealant out of the leaking joint, let it dry, and lay a fresh bead of gutter sealant over the seam from inside the trough. Let it cure before the next rain, then test it with a hose. A joint that has pulled apart needs refastening first, and anything above the first storey is a job for a pro.
Free to ask. Local shops send quotes, and you pay only when you book one.
By Kasra Taheri, Founder, LoclisPublished
Researched and drafted with AI, then checked claim by claim against the sources listed below before it was published. Prices and rules change; the dates beside each source say when it was last checked.
Step by step
Read when to stop and call a pro, further down this page, before you start.
Step 1: Find the leaking joint
In the rain, or with a hose running into the gutter, note exactly which joint drips: an end cap, a corner mitre, an outlet or a joint between two sections.
Step 2: Pick a dry day
Plan the repair for dry weather inside the sealant's temperature range; OSI lists 40°F to 120°F for its gutter sealant.[1]
Step 4: Clear the gutter
Scoop leaves and grit out of the run on both sides of the joint and sponge out any standing water.
Step 5: Scrape out the old sealant
Use a putty knife and a stiff brush until the joint is bare metal, because the surface must be clean, dry and free of old caulk, grease and dust.[1]
Step 6: Check the joint is tight
Press on both sides of the seam; if the sections move, have separated or the rivets are loose, stop, because sealant will not hold a moving joint.
Step 7: Let it dry and wipe it
Give the joint time to dry fully, then wipe it with a clean dry rag so the new sealant bonds to metal rather than dust.
Step 8: Cut the nozzle
Cut the nozzle at a 45-degree angle to about a 3/8-inch bead.[1]
Step 9: Seal from the inside
Run one continuous bead along the seam inside the trough, pressing it into the joint and up both sides to just below the lip.
Step 10: Finish as the label says
Tool or leave the bead exactly as your product's label directs, since gutter sealants differ on whether to smooth them.
Step 11: Let it cure, then test
Keep water off it for the time on the label, then run a hose into the high end of the run and watch the seam from the ground.
A leaking gutter seam is almost always failed sealant at a joint: an end cap, a corner mitre, an outlet, or the joint where two sections meet. The fix is to strip out the old sealant, dry the joint, and lay a new bead of gutter sealant over the seam from inside the trough, then let it cure before water runs through it. It is a one-ladder job on a single-storey eave. If the joint has pulled apart, the gutter is sagging at the seam, or the eave is higher than the first storey, it is a repair for a pro.
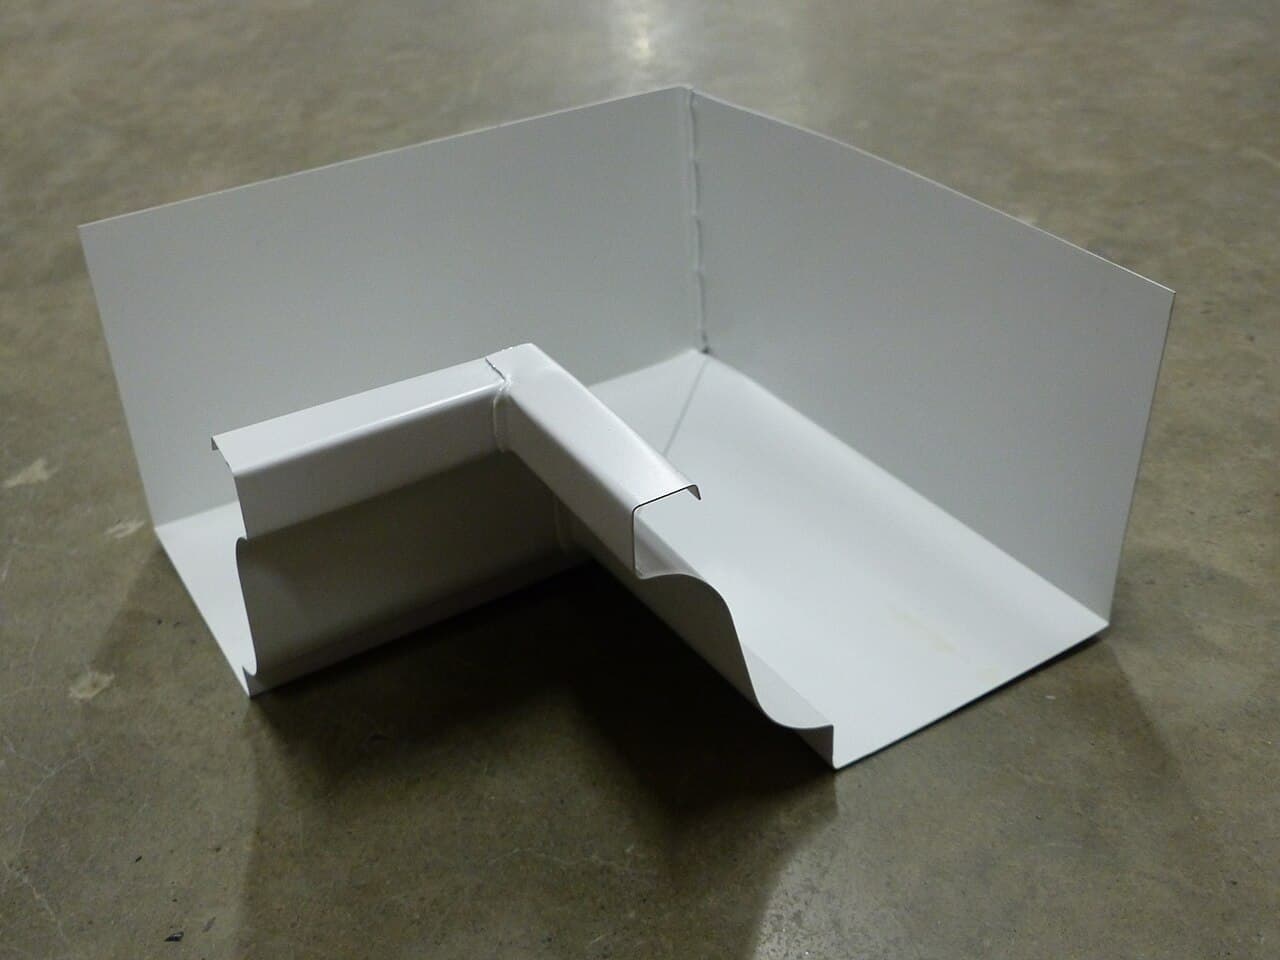
Where gutter seams are, and why they leak
Sectional gutters are the ones bought off the rack. Amerimax's installation sheet lists gutter in 10-foot lengths, joined with seamers or slip-joint connectors,[3] and it calls for sealant on the end caps, the inside mitre joints and all connecting points.[3] For its 6-inch gutter, the 6-inch sections connect by cutting 3 inches off the top lip and sliding them together,[3] which leaves an overlap that depends on sealant to stay dry. Seamless gutters are formed in one piece per run, so their only seams are at corners, end caps and outlets.
Sealant fails for a handful of reasons. It ages and shrinks in sun and frost. The metal expands and contracts every day, which works a joint loose over the years. Leaves and grit hold water against the seam. And where a gutter has lost its slope, water pools at the low joint instead of draining away. Gutters should slope at least 1/16 inch per foot of run toward the downspouts,[4] so a seam that sits in a puddle after rain is a sign to check the slope as well as the sealant.
Choosing a sealant
Use a sealant made for gutters and matched to your gutter's material. OSI's gutter sealant, for example, is designed for sealing aluminum, galvanized steel and vinyl gutters and downspouts, including seam joints and cracks in gutter troughs,[1] and its data sheet says it is not suitable for use on copper, rubber, silicone or butyl rubber.[1] Bostik describes its Gutter & Seam Sealer Pro as particularly effective for sealing gutter lap joints, end caps and slip joints.[2] Copper gutters need a product whose label names copper.
Read the temperature range on the tube before you pick a day. OSI says to apply it between 40°F and 120°F,[1] while Bostik's hybrid polymer sealant can go on between 0°F and 140°F.[2] Either way the joint has to be dry.
One tube goes a long way. Bostik estimates that a 9.5-ounce cartridge covers about 24 linear feet with a 1/4-inch bead and 11 linear feet with a 3/8-inch bead,[2] far more than one leaking corner needs.
Getting the sealant to stick
Most repeat leaks come from sealant laid over dirt or old caulk. OSI's directions say all surfaces must be clean, dry and free of old caulk, grease, dust and other contaminants.[1] In practice that means scraping the old bead out with a putty knife, brushing the joint to bare metal, and giving it time to dry fully after you rinse it.
The same sheet says to cut the nozzle at a 45-degree angle to the bead size you want, with 3/8 inch recommended,[1] and that joints deeper than 3/8 inch need a backer rod.[1] Lay the bead inside the trough, over the seam, in one continuous pass, and work it into the joint and up the sides. Whether to smooth it differs by product, so follow your tube's label.
Give it time. On OSI's sheet, the sealant skins over in about 30 minutes and reaches full cure in 7 to 14 days, and low temperatures and high humidity stretch both.[1] A few dry days in the forecast help.
Sealant does not fix a slope problem. Bostik's sheet notes that its product is not for constant water-immersion applications,[2] which is what a seam at the bottom of a sag lives in. If water stands at the joint, see how to adjust gutters so they drain properly before or after you reseal.
Staying safe on the ladder
Gutter seams are ladder work. Virginia Commonwealth University's ladder program says to pull the base out so its distance from the wall is one-fourth the height to the point of support,[5] and the top should extend at least 3 feet above the eave, gutter or roofline.[5] It also calls for no ladder work outdoors in winds over 20 miles per hour.[5] Lean the ladder on the wall, not on the gutter, and move it rather than reaching.
Look up before raising a ladder. Virginia's Overhead High Voltage Line Safety Act forbids work that puts a person or a ladder within 10 feet of any overhead high voltage line,[6] and the service drop to the house is often near a corner.
Gutter sealants are solvent products. OSI labels its white and aluminum versions flammable and says not to use or store them near heat, sparks or open flame.[1] Wear gloves and keep the tube away from anything lit.
Stop and call a pro if
- The gutter is above the first storey, or the only way to reach the seam is from the roof.
- The joint has pulled apart or the sections have shifted, so it needs new rivets, screws or a connector rather than sealant. That often goes with a gutter pulling away from the house.
- The metal at the seam is rusted through, split or badly dented.
- Water runs behind the gutter onto the fascia, or the fascia is soft, which involves the roof edge.
- Most of the seams are leaking, which is a sign to weigh repairing or replacing the gutters. In Virginia, a Class C licence covers construction, removal, repair or improvement jobs with a single contract over $1,000 and under $30,000,[7] so check the licence of anyone quoting a job of that size.
For more on gutters, roofs and eaves, browse the roofing answers, gutter repair on Loclis, or exterior pros around Blacksburg. If the seam is out of reach or keeps failing, describe the gutter repair once and licensed local businesses quote it.
Common questions
- Which sealant should I use on a gutter seam?
- Use a sealant sold for gutters and matched to your gutter's material, not general-purpose bathroom caulk. OSI's gutter sealant is made for aluminum, galvanized steel and vinyl gutters and is not for copper, so copper gutters need a product whose label lists copper.
- Can I seal a gutter seam in cold weather?
- Only within the range on the label. OSI lists 40°F to 120°F for application; Bostik's hybrid sealer lists 0°F to 140°F. The surface also has to be dry, and cold, damp weather slows curing, so a mild, dry spell is the time to do it.
- Should the sealant go on the inside or outside of the gutter?
- Inside, over the seam, where the water sits. A bead on the outside only hides the drip while water keeps working through the joint from the trough side.
- How long before it can rain on a fresh seam?
- Check the label. OSI's sealant skins over in about 30 minutes but takes 7 to 14 days to cure fully, longer in cold or humid weather. A forecast with a few dry days ahead gives it the best start.
- Why does the same seam keep leaking?
- Usually because the joint is moving, the old sealant was not fully removed, or water stands at that spot because the gutter has lost its slope. Fix the slope or the loose joint, and the new sealant has a chance to last.
Sources
- [1] OSI Gutter Sealant, Technical Data Sheet, Henkel Corporation (OSI). Checked October 26, 2026.
- [2] Gutter & Seam Sealer Pro, Product Data Sheet, Bostik, Inc.. Checked October 26, 2026.
- [3] Installing Metal Gutter Systems, Amerimax Home Products. Checked October 26, 2026.
- [4] Gutters and Downspouts, Building America Solution Center, Pacific Northwest National Laboratory, U.S. Department of Energy. Checked October 26, 2026.
- [5] Portable Ladder Safety Program, Virginia Commonwealth University, Safety and Risk Management. Checked October 26, 2026.
- [6] Va. Code § 59.1-408, Prohibited activities (Overhead High Voltage Line Safety Act), Code of Virginia, Virginia General Assembly. Checked October 26, 2026.
- [7] Va. Code § 54.1-1100, Definitions (Contractors), Code of Virginia, Virginia General Assembly. Checked October 26, 2026.
Want a pro to handle it?
Describe the job once. Licensed local businesses send quotes, and you pay only when you book one.
Get a quote for Roofing